


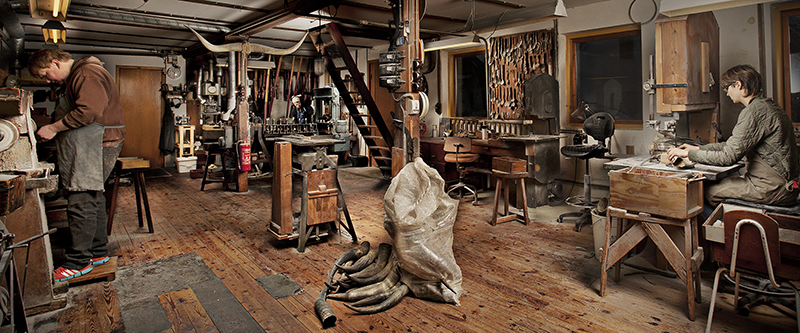
The old workshop in Bøvlingbjerg
Our workshop is committed to respect for craftsmanship and preservation of the practical knowledge built up over the decades. New machines have been introduced over the years to reduce production times, but by and large, the work processes are the same as they were two hundred years ago, when this type of small-scale artisanship was common in these parts.
The factory itself dates back to 1935, and the present workshop was built in 1947. The workshop is open for visits all year round in the shop’s opening hours. If you can’t come to visit us, you can see how a horn spoon is made here on the website.
How do you make a horn spoon?
There are approx. 18 work processes involved in the manufacture of a horn spoon, with slightly more for salad servers and less for e.g. a small egg spoon. All spoons go through the following processes, where the raw horn is selected, sawed, rubbed, shaped, cut, sanded, polished, and checked.
1. Selecting the horn
Not all horns are suitable for spoon making. The horn cannot have any visible defects like cracks or holes and must conform to certain dimensional requirements depending on the shape of the spoon in question. Also, the raw horn cannot be too ‘dull’ i.e. there should be some visual play of colours and patterns to really show its natural beauty.
2. Sawing the spoon
Once we have found a suitable horn, we draw an outline of the spoon onto its surface and saw out the piece using a band saw. When producing a set of salad servers we try to make three spoons from each horn, as one is often lost due to imperfections in the horn.
3. Rubbing the spoon
‘Rubbing’ a spoon means that we grind it to a even thickness using very coarse sandpaper. This process is very important, as the spoon can be shaped and sanded much easier and quicker from a piece of uniform thickness.
4. Creating the shape
Once the spoon has an even thickness, we need to shape it. We first lower the handle section into 165 degrees Celsius hot oil for a few minutes. The horn soon becomes as soft as leather and is placed in a vice to straighten it. We repeat the process for the bowl of the spoon, but this section is shaped using an oak last.
5. Fine cutting
The spoon has now been given its final shape, but there is still some excess material, which is removed on the band saw. We use a finished spoon as a model for this job.
6. Sanding
We now sand the spoon to its final shape, starting with very coarse sandpaper and progressing to the finest grains. There is still some way to go for the spoon, though.
7. High-gloss polishing
Once the spoon’s form is perfected, it is polished using a cloth buffer disc. This gives the spoon the high-gloss finish that makes horn spoons so attractive. Sometimes the polishing process will reveal flaws in the spoon, causing us to discard it.
8. Quality control
The polished spoon is cleaned to remove dust and polishing agents. During this process we also check each spoon for any grind marks or other imperfections. The spoon is now ready for the shop.